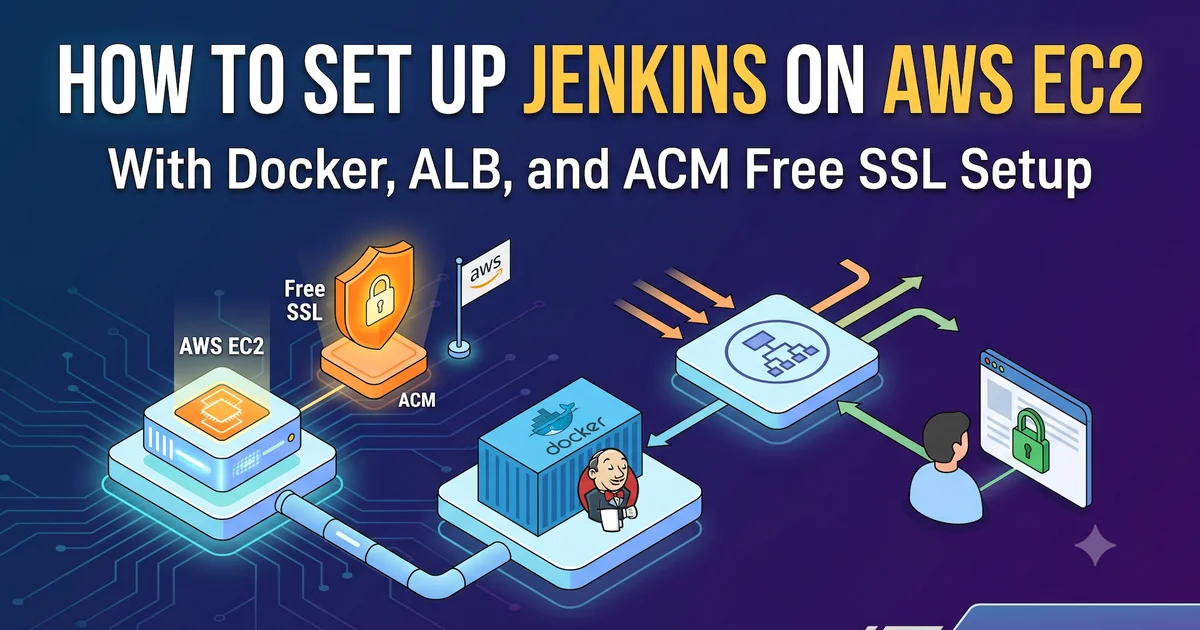
🗺️ What We Build in This Video
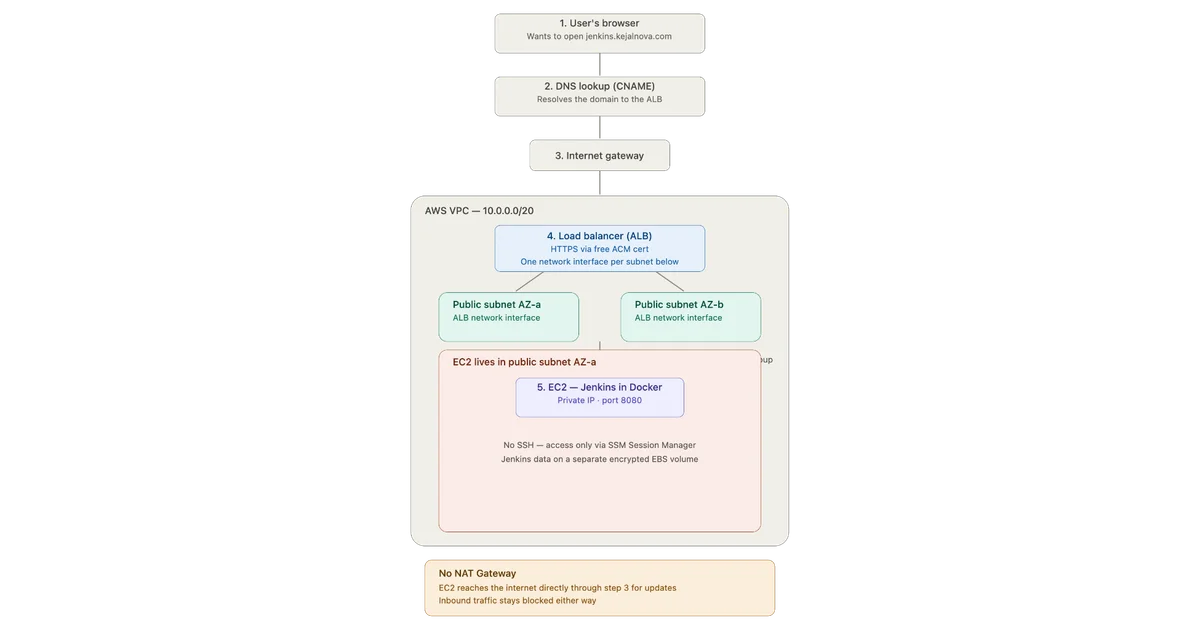
- 🌐 A VPC with two public subnets across two Availability Zones.
- 🔒 Security groups that lock the server down completely — no SSH, no open ports except through the load balancer.
- 🔑 An IAM role for keyless, SSH-free server access via AWS Systems Manager.
- 🖥️ An EC2 instance running Jenkins inside Docker, with a separate encrypted EBS volume for persistent data.
- 📜 A free, auto-renewing HTTPS certificate via AWS Certificate Manager (ACM).
- ⚖️ An Application Load Balancer with HTTP → HTTPS redirect.
- 🌐 Custom domain DNS setup (including what to do if your domain isn't on Route 53).
📋 Prerequisites
Before you start, make sure you have:
- An AWS Account (you can sign up at aws.amazon.com).
- A Domain Name (e.g.,
kejalnova.comorjenkins.kejalnova.com) registered with a provider like Hostinger, Namecheap, GoDaddy, or AWS Route 53.
🛠️ Step 1: Set Up the Virtual Network (VPC & Subnets)
Think of the VPC as your private fenced plot of land in the AWS city, and subnets as dividing that plot into different rooms (e.g., front yard and backyard).
1.1 Create the VPC
- Log in to your AWS Management Console.
- In the top search bar, type
VPCand select VPC under Services. - On the VPC Dashboard, click the orange Create VPC button.
- Select the VPC only option.
- Configure the following details:
- Name tag:
kejalnova-jenkins-vpc - IPv4 CIDR block:
10.0.0.0/20(This gives us 4,096 private IP addresses for our network)
- Name tag:
- Leave everything else as default and click Create VPC.
1.2 Create Two Subnets
Our load balancer requires at least two subnets in different physical locations (Availability Zones) to guarantee reliability if one data center goes down.
- In the left-hand menu, click Subnets.
- Click the Create subnet button in the top right.
- Under VPC ID, select
kejalnova-jenkins-vpc. - Create the First Subnet:
- Subnet name:
kejalnova-jenkins-public-1a - Availability Zone: Select
us-east-1a(or your preferred primary zone) - IPv4 CIDR block:
10.0.1.0/24
- Subnet name:
- Click Add new subnet to create the Second Subnet:
- Subnet name:
kejalnova-jenkins-public-1b - Availability Zone: Select
us-east-1b(must be different from the first one) - IPv4 CIDR block:
10.0.2.0/24
- Subnet name:
- Click Create subnet.
1.3 Create the Internet Gateway (The Front Door)
Right now, our subnets are completely isolated from the internet. We need to install a front door.
- In the left-hand menu, click Internet gateways.
- Click Create internet gateway.
- Name it:
kejalnova-jenkins-igwand click Create internet gateway. - Once created, click the Actions button in the top right and select Attach to VPC.
- Select
kejalnova-jenkins-vpcand click Attach internet gateway.
1.4 Create the Route Table (The Signpost)
Now we must instruct traffic in our subnets on how to find the internet gateway.
- In the left-hand menu, click Route tables.
- Click Create route table.
- Configure the following details:
- Name:
kejalnova-jenkins-public-rt - VPC: Select
kejalnova-jenkins-vpc
- Name:
- Click Create route table.
- With the new route table selected, click the Routes tab at the bottom and click Edit routes.
- Click Add route:
- Destination: Type
0.0.0.0/0(This means "all internet traffic") - Target: Select Internet Gateway, and click
kejalnova-jenkins-igw.
- Destination: Type
- Click Save changes.
- Go to the Subnet associations tab next to Routes.
- Click Edit subnet associations.
- Check the box for both
kejalnova-jenkins-public-1aandkejalnova-jenkins-public-1b. - Click Save associations.
1.5 Enable Public IP Addresses
- Click Subnets in the left menu.
- Select
kejalnova-jenkins-public-1a. - Click Actions (top right) $\rightarrow$ Edit subnet settings.
- Check the box for Auto-assign public IPv4 address.
- Scroll down and click Save.
- Repeat this exact step for
kejalnova-jenkins-public-1b.
🛡️ Step 2: Create Security Groups (The Firewall Bouncers)
A Security Group checks the ID of every incoming request. We will set up one for the Load Balancer (main gate) and one for the EC2 server (office door).
2.1 Security Group for the Load Balancer
- In the left-hand VPC menu under Security, click Security groups.
- Click Create security group.
- Configure the following details:
- Security group name:
kejalnova-jenkins-alb-sg - Description:
Allows web traffic to the Load Balancer - VPC: Select
kejalnova-jenkins-vpc(clear the default VPC if it is pre-selected)
- Security group name:
- Under Inbound rules, click Add rule twice to add these rules:
- Rule 1:
- Type:
HTTPS - Source:
Anywhere-IPv4(0.0.0.0/0)
- Type:
- Rule 2:
- Type:
HTTP - Source:
Anywhere-IPv4(0.0.0.0/0) (We use this only to redirect users to secure HTTPS)
- Type:
- Rule 1:
- Scroll to the bottom and click Create security group.
2.2 Security Group for the EC2 Server
- Click Security groups in the left menu again.
- Click Create security group.
- Configure the following details:
- Security group name:
kejalnova-jenkins-ec2-sg - Description:
Allows traffic only from the Load Balancer - VPC: Select
kejalnova-jenkins-vpc
- Security group name:
- Under Inbound rules, click Add rule:
- Type:
Custom TCP - Port range:
8080(Jenkins default port) - Source: Click the search box, start typing
sg-, and selectkejalnova-jenkins-alb-sgfrom the list.
- Type:
- Scroll to the bottom and click Create security group.
[!IMPORTANT] Notice we are not opening Port 22 (SSH) to the internet. This blocks malicious bots from trying to guess passwords or exploit SSH vulnerabilities.
🔑 Step 3: Create the IAM Role (Keyless Entry Badge)
Instead of keeping a risky SSH key file on your laptop, we will give the server an AWS "identity badge" so we can log in securely using our browser.
- In the top search bar, type
IAMand select IAM (Identity and Access Management). - In the left sidebar, click Roles, and click Create role.
- Select AWS service as the Trusted entity type.
- Under Service or use case, select EC2 from the dropdown and click Next.
- In the permissions search box, search for:
AmazonSSMManagedInstanceCore - Check the checkbox next to
AmazonSSMManagedInstanceCore. - Click Next.
- Name the role:
kejalnova-jenkins-ec2-ssm-role. - Click Create role at the bottom.
🖥️ Step 4: Launch the EC2 Server & Create Storage
Now we deploy the virtual computer and set up a secondary hard drive for our Jenkins data.
4.1 Launch the EC2 Instance
- Search for
EC2in the top bar and select EC2. - Click the orange Launch instance button.
- Configure the settings:
- Name:
kejalnova-jenkins-master - Application and OS Images: Select Amazon Linux 2023 (should be selected by default under the Amazon Linux AMI tag).
- Instance type: Select
t3.micro(Highly cost-effective; you can always upgrade this size later without losing data!). - Key pair: Select Proceed without a key pair (Not recommended). (Don't worry! We will use the secure SSM role we created in Step 3 to log in).
- Network settings (Click Edit on the right):
- VPC: Select
kejalnova-jenkins-vpc. - Subnet: Select
kejalnova-jenkins-public-1a. - Auto-assign public IP: Select Enable.
- Firewall (security groups): Select Select existing security group and choose
kejalnova-jenkins-ec2-sg.
- VPC: Select
- Configure storage:
- Change the size of the root volume to
30GiB (typegp3). Click the arrow to expand and ensure Encrypted is selected.
- Change the size of the root volume to
- Advanced details (Expand this section at the bottom):
- Find IAM instance profile and select
kejalnova-jenkins-ec2-ssm-role.
- Find IAM instance profile and select
- Name:
- Click Launch instance in the summary panel on the right.
4.2 Create and Attach a Dedicated Data Disk (EBS Volume)
By separating Jenkins data from the operating system disk, your server becomes completely disposable. You can upgrade or replace the server later without losing configurations.
- In the left EC2 menu, scroll down to Elastic Block Store and click Volumes.
- Click Create volume in the top right.
- Configure settings:
- Volume type:
gp3 - Size:
20GiB - Availability Zone: Select
us-east-1a(This must match the subnet zone where you launched your EC2 instance!) - Encryption: Check the box for Encrypt this volume.
- Volume type:
- Click Create volume.
- Once the state is Available, select the volume, click Actions (top right) $\rightarrow$ Attach volume.
- In Instance, select
kejalnova-jenkins-masterfrom the dropdown. - Leave the Device name as
/dev/xvdf(or default) and click Attach volume. - Go back to Instances in the left menu, select
kejalnova-jenkins-master, and click the Storage tab at the bottom. - Locate the secondary volume you just attached (usually 20 GB). Click its volume ID.
- Click Actions $\rightarrow$ Modify volume. Under settings, ensure Delete on termination is set to No (if prompt allows, or verify this parameter in EC2 Instance Storage edit options). This prevents AWS from deleting your data volume if the server is terminated.
⌨️ Step 5: Format the Data Disk & Install Jenkins
Now, we will connect to the server's terminal from the web browser to format our secondary disk and run Jenkins.
5.1 Connect to the Server
- Go to Instances in the left menu.
- Select
kejalnova-jenkins-masterand click the Connect button at the top. - Select the Session Manager tab.
- Click the Connect button. A black terminal window will open in a new browser tab.
5.2 Prepare and Mount the Data Disk
Run these commands one-by-one inside the black terminal window:
Check if the secondary volume is visible:
lsblkYou should see
nvme1n1(20G) listed without any sub-items, which is your blank data disk.Confirm the disk is empty (should return
data):sudo file -s /dev/nvme1n1Format the disk with the XFS system:
sudo mkfs -t xfs /dev/nvme1n1Create the folder where Jenkins will store its data:
sudo mkdir -p /data/jenkins_homeMount (connect) the disk to this new folder:
sudo mount /dev/nvme1n1 /data/jenkins_homeConfigure the disk to connect automatically even if the server restarts:
echo "/dev/nvme1n1 /data/jenkins_home xfs defaults,nofail 0 2" | sudo tee -a /etc/fstab
5.3 Install Docker
Docker lets us run Jenkins in a self-contained sandbox.
Run the installation command:
sudo dnf install -y dockerStart and enable Docker so it runs automatically on reboot:
sudo systemctl enable --now docker
5.4 Run the Jenkins Container
Give permissions of the data folder to the Jenkins user inside the container:
sudo chown -R 1000:1000 /data/jenkins_homeRun the Jenkins container:
sudo docker run -d \
  --name jenkins \
  --restart unless-stopped \
  --user 1000:1000 \
  -p 8080:8080 \
  -v /data/jenkins_home:/var/jenkins_home \
  jenkins/jenkins:lts-jdk17
Confirm Jenkins is running (it should say "Up" under STATUS):
sudo docker psRetrieve the temporary administrator password (needed to unlock Jenkins):
sudo docker exec jenkins cat /var/jenkins_home/secrets/initialAdminPasswordSelect the 32-character code printed on the screen, copy it, and save it in a safe place.
🔒 Step 6: Secure Jenkins with HTTPS (SSL & Load Balancer)
We will request a free SSL certificate from AWS and set up a Load Balancer to route encrypted traffic.
6.1 Request a Free SSL Certificate
- Search for
Certificate Managerin the top AWS search bar and select Certificate Manager. - Click Request certificate.
- Select Request a public certificate and click Next.
- Configure the settings:
- Fully qualified domain name: Enter your domain (e.g.,
jenkins.kejalnova.com). - Validation method: Select DNS validation.
- Fully qualified domain name: Enter your domain (e.g.,
- Click Request.
- On the next screen, click the Certificate ID link.
- Under Domains, you will see a CNAME Name and CNAME Value. You will need to add these values to your domain registrar (e.g. Hostinger, GoDaddy) to prove you own the domain. Once added, AWS will automatically issue the certificate (it will change from Pending validation to Issued).
6.2 Create a Target Group
- Search for
EC2and navigate back to the EC2 Dashboard. - In the left menu under Load Balancing, click Target Groups.
- Click Create target group.
- Select Instances as the target type.
- Configure settings:
- Target group name:
kejalnova-jenkins-tg - Protocol:
HTTP - Port:
8080(The port Jenkins is listening on) - VPC: Select
kejalnova-jenkins-vpc - Health checks path: Change from
/to/login
- Target group name:
- Click Next.
- Under Register targets, select the checkbox next to
kejalnova-jenkins-master. - Click Include as pending below.
- Click Create target group.
6.3 Create the Load Balancer
- In the left EC2 menu under Load Balancing, click Load Balancers.
- Click Create load balancer (top left).
- Under Application Load Balancer, click Create.
- Configure settings:
- Load balancer name:
kejalnova-jenkins-alb - Scheme:
Internet-facing - IP address type:
IPv4 - Network mapping:
- VPC: Select
kejalnova-jenkins-vpc. - Mappings: Check the boxes for both Availability Zones (
us-east-1aandus-east-1b) and select the public subnets you created.
- VPC: Select
- Security groups: Remove the default and select
kejalnova-jenkins-alb-sg. - Listeners and routing:
- Listener 1 (HTTP:80): Set default action to Forward to and select
kejalnova-jenkins-tg. - Click Add listener.
- Listener 2 (HTTPS:443): Set default action to Forward to and select
kejalnova-jenkins-tg. - Under Secure listener settings, select the ACM Certificate you requested in step 6.1.
- Listener 1 (HTTP:80): Set default action to Forward to and select
- Load balancer name:
- Click Create load balancer.
6.4 Force HTTPS (Automatic Redirection)
- Select your new load balancer
kejalnova-jenkins-albfrom the list. - Click the Listeners tab at the bottom.
- Select the checkmark next to the HTTP:80 listener, and click Manage listener $\rightarrow$ Edit listener.
- Delete the existing default action (Forward to target group).
- Add a new action: Redirect to URL.
- Set the protocol to
HTTPSand port to443. - Select 301 - Permanent as the status code.
- Click Save changes.
🌐 Step 7: Point Your Domain to the Load Balancer
Now we tell your domain registrar (e.g. Hostinger) where to send users when they visit your URL.
- Go to the Load Balancers page in AWS and select
kejalnova-jenkins-alb. - Locate the DNS name in the details panel (it will look like
kejalnova-jenkins-alb-123456789.us-east-1.elb.amazonaws.com). Copy this. - Log in to your domain registrar (e.g., Hostinger, GoDaddy, Namecheap).
- Go to the DNS Zone Editor or DNS Settings for your domain.
- Add a new CNAME record:
- Type:
CNAME - Name/Host:
jenkins(if you wantjenkins.kejalnova.com) or@(if you want the root domain) - Target/Points to: Paste the DNS Name you copied in step 2.
- TTL: Leave as default (e.g., 14400 or 3600)
- Type:
- Save the record.
🎉 Step 8: Test Your Setup!
- Wait a couple of minutes for DNS changes to propagate and for AWS to check the health of your instance.
- Open a web browser and type:
https://jenkins.kejalnova.com(replace with your actual domain). - Success! You should see the secure green padlock in the address bar and the Jenkins setup wizard on the page.
- Paste the administrator password you copied in Step 5.4 to unlock the wizard.
- Select Install suggested plugins and create your admin account.
// comments (0)
// no comments yet — be the first!
Want to join the discussion?
→ login create account